I prepared my mobile DevOps demo for our roadshow yesterday. I created an end to end scenario with Xamarin, Visual Studio Team Services (VSTS), the Xamarin test cloud and HockeyApp. I was pretty impressed that it only took me a few hours to get everything running. But there were some pitfalls – so here is a step by step guide to get you up and running in a few hours.
1. Install Xamarin
If you haven’t installed Xamarin yet you can do it with the Visual Studio installer. Open Programs and Features, select Visual Studio Enterprise 2015, click change and select modify.
Under Cross Platform Mobile Development select C#/.Net (Xamarin v4.1.0). This will automatically activate some other features like Android SDK.
2. Create your Xamarin project in Visual Studio
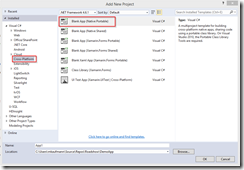
Create a new solution in your VSTS repository of the type Blank App (Native Portable).
This will create four projects: a portable library that is referenced in all other projects, one project for iOS, one project for android and one project for windows phone.
If you hit F5 an Android emulator should come up and display the sample code (an app with a button that counts the clicks on it).
3. Add UITests
To use the Xamarin Test Cloud you have to add UI tests to your project. Add a new project of the type “UI Test App”.
In the class “AppInitializer” add the relative path to the apk package.
Now add a new test that clicks the button and verifies that the text is updated correctly. Note that I’ve added a screenshot to the test after clicking the button.
[Test]
public void ClickButton()
{
app.Tap(x => x.Button("myButton"));

app.Screenshot("Tab Button");

var result = app.Query(x => x.Button("myButton").Text("1 clicks!"));

Assert.IsTrue(result.Any(), "The expected text was not found.");
}
4. Create keystore file
To use the HockeyApp for distribution it is required to sign the package in the build. To sign the package we have to add a keystore to the project. Open a command prompt and navigate to your solution folder. Expand the %PATH% to include your version of the JRE. Start keytool with the following arguments:
$ set path=%path%;C:\Program Files (x86)\Java\jre1.8.0_45\bin
$ keytool -genkey -v -keystore my-release-key.keystore -sigalg SHA1withDSA -keyalg DSA -keysize 1024
Enter the passwords and data that is needed for the certificate. After the keystore was execute the following command:
$ keytool -keystore .\my-release-key.keystore -list -v
Note the alias for later user.
Add the keystore to your repository and commit and push all your changes to your Visual Studio Team Services project.
5. Create your team build
If you don’t have a Xamarin account yet, then sign up for it now. You will need the email and password during the build creation.
Open your project in VSTS and create a new build from the Xamarin.Android template.
Go to the variables tab and add some variables:
- XAccount: the Xamarin Account email
- XPass: the Xamarin Account password
- KeyPass: password key for key (see step 4)
- optional: key store password if different (see step 4)
- KeyAlias: alias for key (see step 4)
For the “Activate Xamarin license” and “Deactivate Xamarin license” tasks set the email and password to $(XAccount) and $(XPassword).
Add a “Copy file task” before the signing task and copy the keystore to the binaries directory.
Enable Jarsigning and Zipalign in the “Signing and aligning APK file(s)” task. Note that the path to the keystore contains the project name – depending on the copy file task and your project structure! I’ve used the same password for the keystore and the key. If you have different passwords you have to use the corresponding variable here.
Log in to https://testcloud.xamarin.com and get the API key for your team.
Create a new test run.
Select the devices that you want to run the tests on and follow the wizard to the last page. You only need the devices string. Copy the string and cancel the wizard.
Go back to your build and enter the data gathered (API key, device string) in the Xamarin Test Cloud task.
The see the test output in the build results you have to add a publish test results task to the build.
Publish the results directory ($(build.binariesdirectory)\$(build.configuration)) to the drop artifact.
Run the build and verify that everything works as expected.
6. Link HockeyApp to you VSTS project
Login to https://rink.hockeyapp.net and create a API token with full access. You find this under “Account Settings” / “API Tokens”.
Go to the settings of your VSTS team project and create a new service endpoint with the API key you just created.
7. Create a release definition
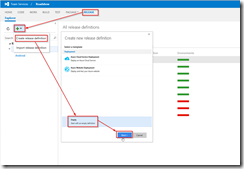
Create an empty release definition. Enable continuous deployment and keep the rest of the default values in wizard.
Link your build to the release definition.
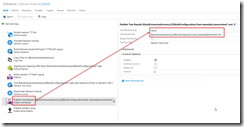
Add an environment and add a HockeyApp task. Select the service endpoint from step 6 and browse to your .apk file from the build output. Select if you want to notify users or make the release mandatory.
Deploy the latest build with the release definition to create the app in HockeyApp.
8. Install Hockey App on your Android phone
Allow installation of apps on your Android phone. You can enable this in Settings –> Security –> Allow unknown sources. Now install the app. The app is not in the store – you have to install it from HockeyApp web site.
Launch the app and sign in with your credentials. You should now see your app. Install and run it on your phone.
9. Enable Crash and Update Reporting in your Project
To enable crash reporting and update notification we have to add some code to the project. Before we do this we have to log in to the HockeyApp web site and get the app id that was automatically generated during your release.
Now open your solution and add the nuget HockeySDK.Xamarin to your Android project. Register the app with the CrashManager and UpdateManager.
[Activity (Label = "DemoApp1.Droid", MainLauncher = true, Icon = "@drawable/Icon")]
public class MainActivity : Activity
{
int count = 1;

protected override void OnCreate (Bundle bundle)
{
base.OnCreate (bundle);

// ...

CrashManager.Register(this, "<app id>");
UpdateManager.Register(this, "<app id>");
}

protected override void OnPause()
{
base.OnPause();

UpdateManager.Unregister();
}

protected override void OnDestroy()
{
base.OnDestroy();

UpdateManager.Unregister();
}
}
10. Enable VSTS Integration in HockeyApp
To receive feedback and crash reports in VSTS we have to enable the integration in HockeyApp. You enable this under Manage App / Visual Studio Team Services.
11. Enable Feedback
To allow the user to send feedback we have to add a new button. Add a feedback button in Main.axml. Add the caption to Strings.xml.
Register the app with the FeedbackManager and add a delegate to the click event of the button that calls the ShowFeedbackActivity method of the FeedbackManager.
Button feedbackButton = FindViewById<Button>(Resource.Id.myFeedbackButton);

feedbackButton.Click += delegate
{
FeedbackManager.ShowFeedbackActivity(ApplicationContext);
};

FeedbackManager.Register(this, "<app id>");
12. End to end test
Everything should be ready at this point and you can start an end 2 end test. Add a “bug” to MainActivity.cs that crashes the app if you click the button 5 times.
button.Click += delegate
{

if (count == 5)
throw new InvalidOperationException("This is a bug that crashes the application.");

button.Text = string.Format("{0} clicks!", count++);
};
Also update the version number to see if the update notification works.
If your build is set to continuous integration it is automatically triggered. The build runs the UI tests in the cloud and displays the test result in your build overview.
Go to https://testcloud.xamarin.com and open your app. You can see more details here including the screenshots of your app that you added to the tests.
If your release was set to continuous deployment your app was automatically deployed to your first environment using the hockey app. Launch the app on your phone. It should automatically detect the update. Install the update.
Now crash the app by click the first button 5 times. If you start the app again you can send the crash report to hockey app.
The crash report is automatically added as a bug to your team project.
Now push the “Send Feedback button” and fill out all the required fields in the form.
The feedback will be added to VSTS as a task.
Conclusion
I was really impressed how easy it was to get the complete mobile DevOps lifecycle implemented. I hope this gives you a good start up if you want to start to play around with mobile DevOps and continuous deployment of cross platform apps. If you have problems with some steps just leave me a comment and I will try to help.


Hi There, This is really useful. Thanks. I am defining a CI process in one of our projects and we wanted to trigger an automated build whenever a pull request is created before merging the code to our master branch. I know the Team services provides Build policies to set this up but not sure how the build steps would look like if the code need to be taken from the pull request rather than a branch where the name of the branch is constant always.
Any help is greatly appreciated.
Thanks
Jeeva
Hi Jeeva. Thanks for the feedback. To your question: just create a build definition for your target branch and select it in your bramch policy. The build will automatically run on the pull request base. See https://www.visualstudio.com/docs/git/branch-policies I hope this helps. Write if you need aditional help.
Mike
Lovelly blog you have here